> ## Documentation Index
> Fetch the complete documentation index at: https://docs.junojourney.com/llms.txt
> Use this file to discover all available pages before exploring further.
# Courses
> Create structured learning content with sections, questions, completion tracking, and certificates.
export const RelatedPages = ({pages = []}) => {
if (pages.length === 0) return null;
return <>
Related articles
{pages.map(page => )}
;
};
export const VideoWalkthrough = ({src, alt, caption}) => {
return
 ;
};
export const RoleBadge = ({roles = []}) => {
const colorMap = {
Admin: "yellow",
Manager: "blue",
Learner: "green",
"Co-editor": "purple"
};
return <>
{roles.map(role => {role}{" "})}
;
};
## What is a course?
A Course (aka 'learning' unit type) is Juno's main content type for structured learning. Courses contain **sections** — each section holds content like text, images, videos, embedded resources, and questions.
;
};
export const RoleBadge = ({roles = []}) => {
const colorMap = {
Admin: "yellow",
Manager: "blue",
Learner: "green",
"Co-editor": "purple"
};
return <>
{roles.map(role => {role}{" "})}
;
};
## What is a course?
A Course (aka 'learning' unit type) is Juno's main content type for structured learning. Courses contain **sections** — each section holds content like text, images, videos, embedded resources, and questions.
 Learners progress through sections and complete the course based on your configured completion criteria.
***
## Course structure
A Course is made up of sections. Each section can contain:
* Rich text content
* Embedded videos and images
* Questions (multiple choice, open text, true/false)
* File uploads and interactive elements
***
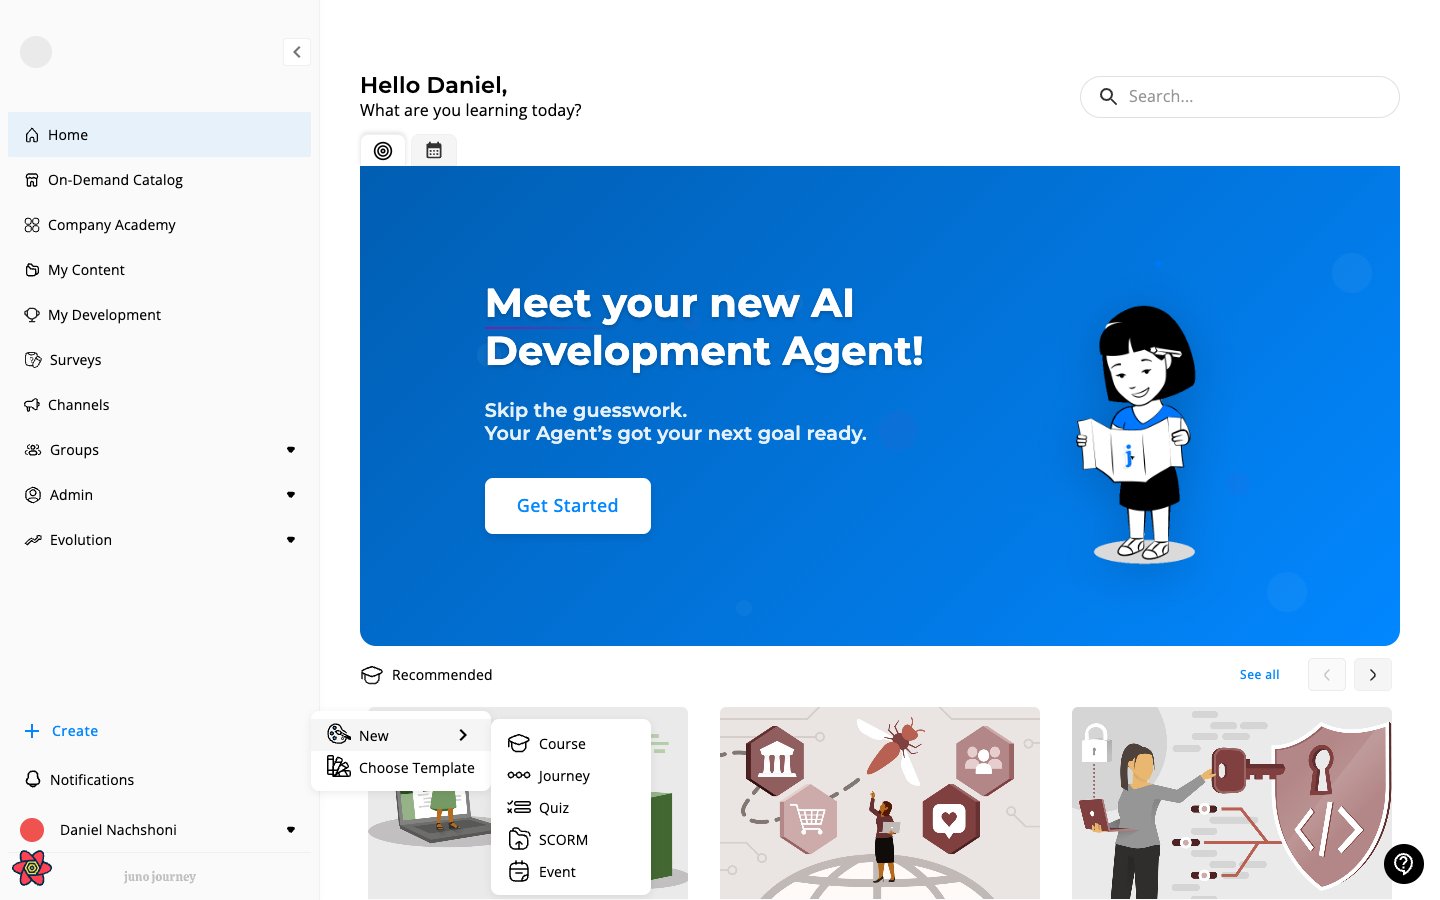
## Creating a course
Click **+ Create** in the sidebar, hover **New**, and choose **Course**.
Learners progress through sections and complete the course based on your configured completion criteria.
***
## Course structure
A Course is made up of sections. Each section can contain:
* Rich text content
* Embedded videos and images
* Questions (multiple choice, open text, true/false)
* File uploads and interactive elements
***
## Creating a course
Click **+ Create** in the sidebar, hover **New**, and choose **Course**.
 Add a title, description, thumbnail image, and language.
Add sections with content, questions, and media. Drag to reorder.
Open the settings panel to configure completion criteria, due dates, and permissions (see below).
Review and publish. The course appears in the Company Academy for learners.
***
## Course settings
The settings panel has **3 tabs** for courses: General, Course Behavior, and Permission & Control.
Add a title, description, thumbnail image, and language.
Add sections with content, questions, and media. Drag to reorder.
Open the settings panel to configure completion criteria, due dates, and permissions (see below).
Review and publish. The course appears in the Company Academy for learners.
***
## Course settings
The settings panel has **3 tabs** for courses: General, Course Behavior, and Permission & Control.
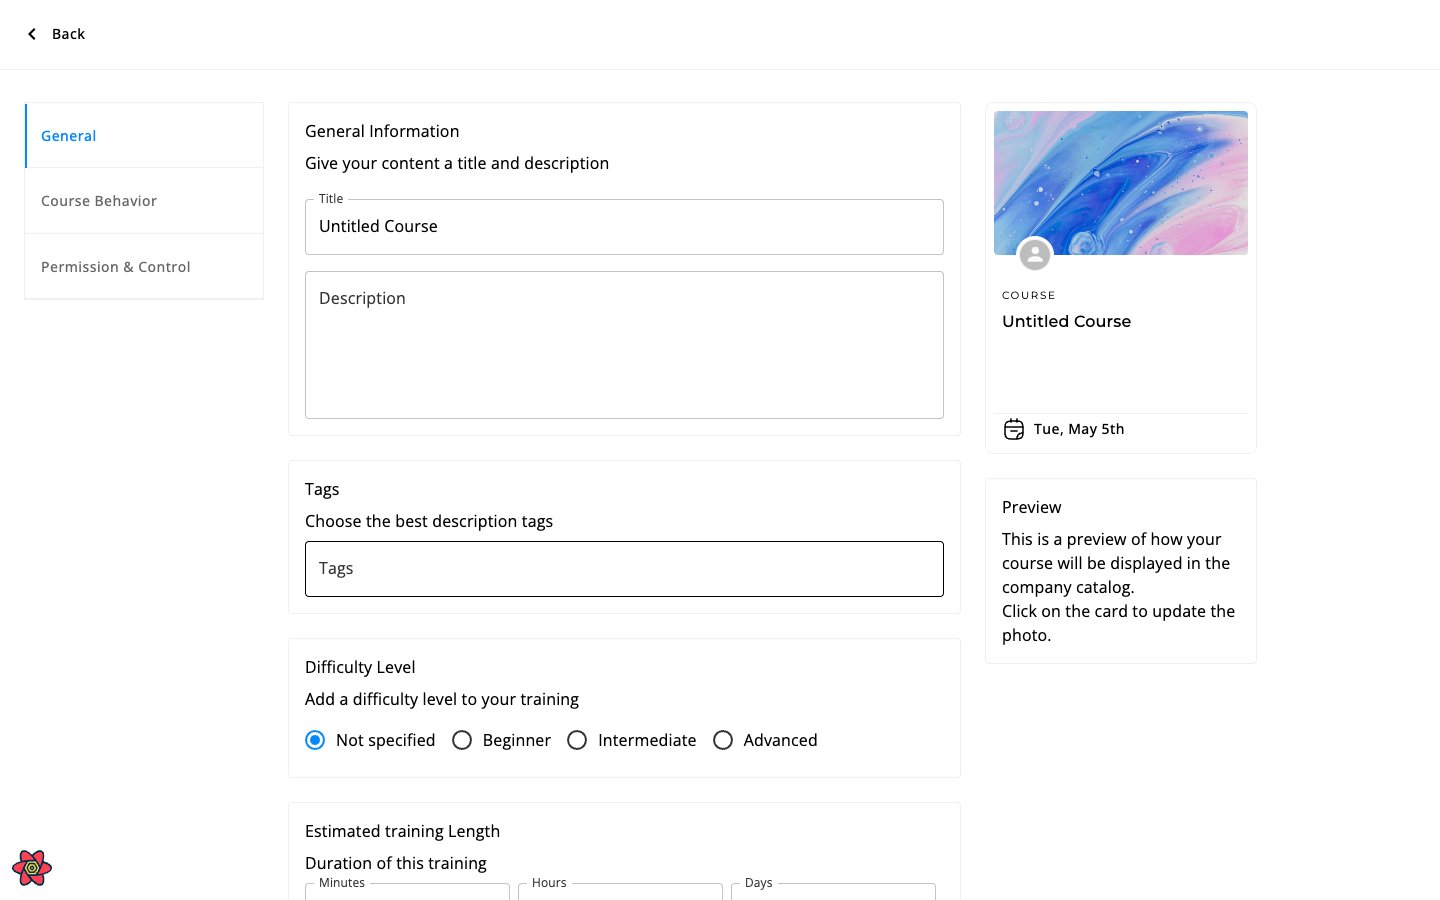 ### General tab
| Setting | What it does |
| ----------------------------- | ------------------------------------------------------------------ |
| **Title** | Course name |
| **Description** | Course description |
| **Tags** | Categorize the course for search and filtering |
| **Difficulty level** | Beginner, Intermediate, or Advanced |
| **Estimated training length** | Expected time to complete |
| **Language** | Course language (if your org has multiple languages configured) |
| **Cover image** | The hero image learners see on the course intro screen |
| **Cover image blur** | Softens the cover image so overlay text stays readable (see below) |
#### Cover image blur
Use **Cover image blur** when the cover photo has busy details, bright areas, or low contrast against the title and description. Blur applies a soft focus to the intro image so overlay text stays readable, and it does not change the underlying file.
Go to the course and open the intro screen that shows the cover image.
Hover the cover image and click the **blur** icon next to the photo edit button. Juno highlights the icon when blur is on.
The blur toggle applies instantly to the live course — you do not need to republish. Learners see the change the next time they open the intro screen.
**Course Actions** (bottom of the General tab):
| Action | What it does |
| --------------------- | ---------------------------------------------------- |
| **Duplicate** | Create a copy of the course as a new draft |
| **Convert to Quiz** | Convert the course into a Quiz content type |
| **Copy to Workspace** | Copy the course to another workspace |
| **Archive** | Hide the course from the catalog without deleting it |
| **Delete** | Permanently remove the course |
### Course Behavior tab
**Completion criteria** — Controls when a course is marked as completed:
| Option | What it means |
| ----------------------------- | ----------------------------------------------------------------------- |
| **All sections + all inputs** | Learner accessed every section AND filled in all input fields (default) |
| **All sections** | Learner accessed every section (inputs optional) |
| **All inputs** | Learner filled in all input fields (section access optional) |
**Feedback for closed questions** — Controls when correct answers are revealed:
| Option | What it means |
| ------------------------------------- | ---------------------------------------------------------- |
| **Show correct answer after 1 try** | Correct answer shown immediately after first wrong attempt |
| **Show correct answer after 2 tries** | Correct answer shown after two wrong attempts |
| **Never show correct answer** | Learner never sees the correct answer |
**Due dates** (if enabled for your organization):
* **None** — no deadline
* **Specific date** — a fixed calendar date
* **Relative date** — calculated from assignment date (e.g., "14 days after assignment")
When due dates are set, Juno can send automatic notifications:
* Early warning before the due date (7 days before)
* Reminder before the due date (1 day before)
* Urgent warning for overdue learners (2 days after)
### Permission & Control tab
| Setting | What it does |
| ----------------------------------- | ----------------------------------------------------------------------------------------------------------------------------------- |
| **Co-editors** | Invite other users to collaborate on course creation. Co-editors can edit content and resolve inline comment threads on the course. |
| **Audience** | Restrict visibility to specific user groups in the catalog |
| **Validators** | Assign people responsible for grading open-ended questions |
| **Disable validator notifications** | Turn off email notifications to validators |
| **Share to Channel** | Share the course to a specific channel |
| **Publish to Company Academy** | Toggle course visibility in the catalog |
| **Privacy Settings** | Generate a shareable public link |
| **Access Restriction** | Additional access control settings, allowing only assigned learners to enter the unit. |
| **Validation Mode** | How open questions are graded (see below) |
**Validation Mode** for open-ended questions:
| Mode | How it works |
| ------------- | --------------------------------------------------- |
| **Manual** | A human reviewer reads and grades the response |
| **Auto** | AI automatically validates the response |
| **Recommend** | AI suggests a grade, reviewer confirms or overrides |
Some settings are only visible if your admin has enabled specific features for your organization.
***
## Certificates
Courses can issue certificates on completion:
* Link a certificate template to the course
* Set a certification authority name
* Configure certificate expiration period
See [Certifications](/learning/certifications) for more.
***
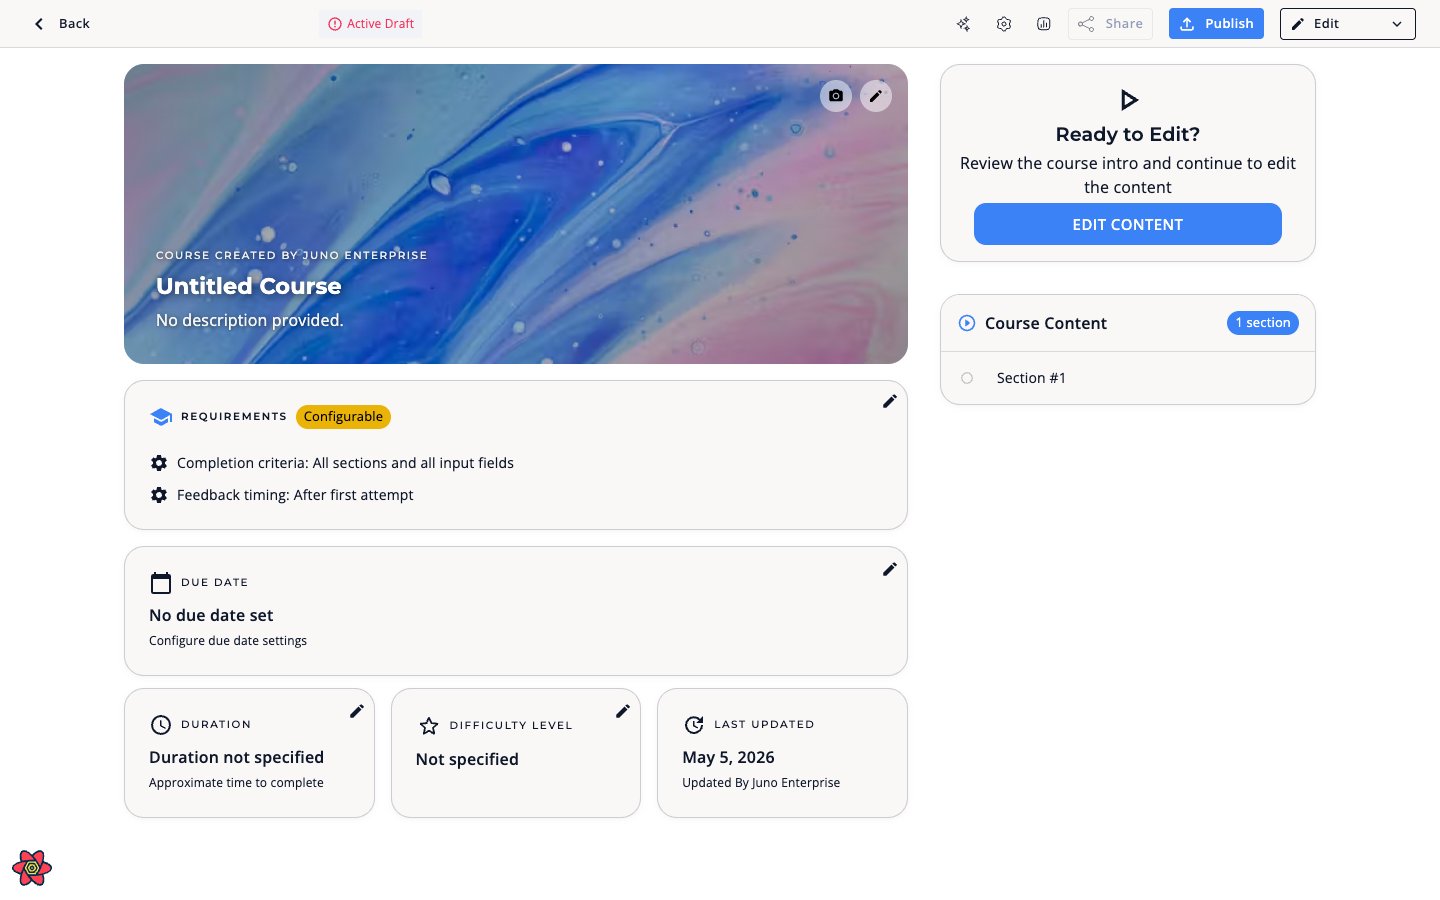
## Cover image
The cover image appears on the course intro page and in the catalog. To set or update it, open the course intro and select **Change photo**.
### Blur the cover image
You can apply a soft blur to the cover image without replacing it — useful when the photo is busy, low resolution, or you want the title and description to stand out.
Navigate to the course you want to edit.
On the cover image, select the blur icon next to **Change photo**. The icon highlights when blur is on.
The change is saved immediately and applied for all learners — you don't need to republish the course.
Blur only affects how the image is displayed. The original photo is preserved, so you can turn the blur off at any time.
***
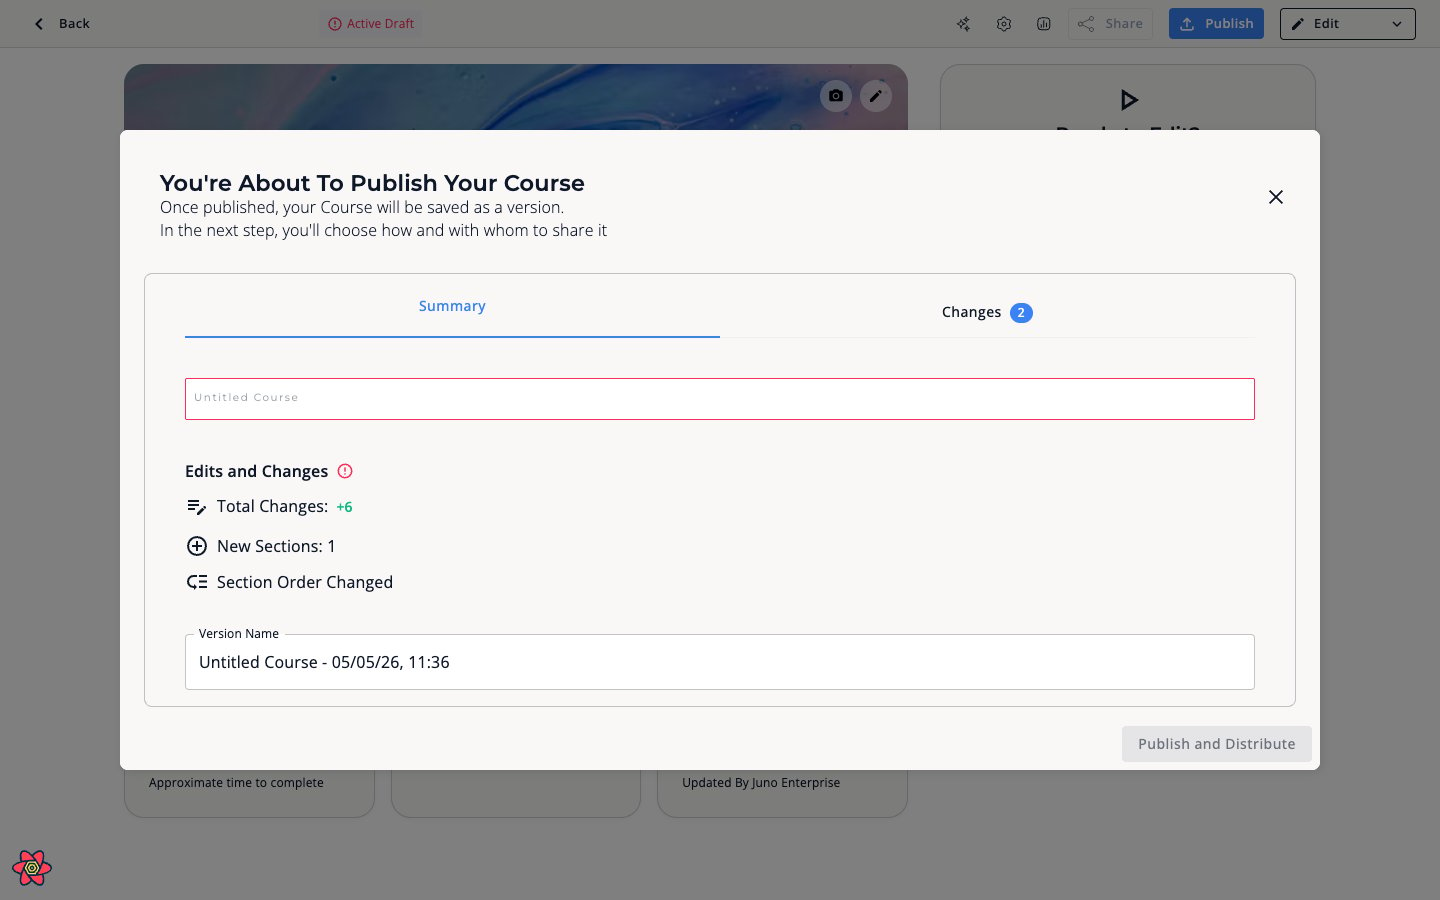
## Publishing & versioning
Courses have a **draft** and **published** version:
* Edit the draft without affecting what learners see
* Publish to push changes live
* Version number increments on each publish
### General tab
| Setting | What it does |
| ----------------------------- | ------------------------------------------------------------------ |
| **Title** | Course name |
| **Description** | Course description |
| **Tags** | Categorize the course for search and filtering |
| **Difficulty level** | Beginner, Intermediate, or Advanced |
| **Estimated training length** | Expected time to complete |
| **Language** | Course language (if your org has multiple languages configured) |
| **Cover image** | The hero image learners see on the course intro screen |
| **Cover image blur** | Softens the cover image so overlay text stays readable (see below) |
#### Cover image blur
Use **Cover image blur** when the cover photo has busy details, bright areas, or low contrast against the title and description. Blur applies a soft focus to the intro image so overlay text stays readable, and it does not change the underlying file.
Go to the course and open the intro screen that shows the cover image.
Hover the cover image and click the **blur** icon next to the photo edit button. Juno highlights the icon when blur is on.
The blur toggle applies instantly to the live course — you do not need to republish. Learners see the change the next time they open the intro screen.
**Course Actions** (bottom of the General tab):
| Action | What it does |
| --------------------- | ---------------------------------------------------- |
| **Duplicate** | Create a copy of the course as a new draft |
| **Convert to Quiz** | Convert the course into a Quiz content type |
| **Copy to Workspace** | Copy the course to another workspace |
| **Archive** | Hide the course from the catalog without deleting it |
| **Delete** | Permanently remove the course |
### Course Behavior tab
**Completion criteria** — Controls when a course is marked as completed:
| Option | What it means |
| ----------------------------- | ----------------------------------------------------------------------- |
| **All sections + all inputs** | Learner accessed every section AND filled in all input fields (default) |
| **All sections** | Learner accessed every section (inputs optional) |
| **All inputs** | Learner filled in all input fields (section access optional) |
**Feedback for closed questions** — Controls when correct answers are revealed:
| Option | What it means |
| ------------------------------------- | ---------------------------------------------------------- |
| **Show correct answer after 1 try** | Correct answer shown immediately after first wrong attempt |
| **Show correct answer after 2 tries** | Correct answer shown after two wrong attempts |
| **Never show correct answer** | Learner never sees the correct answer |
**Due dates** (if enabled for your organization):
* **None** — no deadline
* **Specific date** — a fixed calendar date
* **Relative date** — calculated from assignment date (e.g., "14 days after assignment")
When due dates are set, Juno can send automatic notifications:
* Early warning before the due date (7 days before)
* Reminder before the due date (1 day before)
* Urgent warning for overdue learners (2 days after)
### Permission & Control tab
| Setting | What it does |
| ----------------------------------- | ----------------------------------------------------------------------------------------------------------------------------------- |
| **Co-editors** | Invite other users to collaborate on course creation. Co-editors can edit content and resolve inline comment threads on the course. |
| **Audience** | Restrict visibility to specific user groups in the catalog |
| **Validators** | Assign people responsible for grading open-ended questions |
| **Disable validator notifications** | Turn off email notifications to validators |
| **Share to Channel** | Share the course to a specific channel |
| **Publish to Company Academy** | Toggle course visibility in the catalog |
| **Privacy Settings** | Generate a shareable public link |
| **Access Restriction** | Additional access control settings, allowing only assigned learners to enter the unit. |
| **Validation Mode** | How open questions are graded (see below) |
**Validation Mode** for open-ended questions:
| Mode | How it works |
| ------------- | --------------------------------------------------- |
| **Manual** | A human reviewer reads and grades the response |
| **Auto** | AI automatically validates the response |
| **Recommend** | AI suggests a grade, reviewer confirms or overrides |
Some settings are only visible if your admin has enabled specific features for your organization.
***
## Certificates
Courses can issue certificates on completion:
* Link a certificate template to the course
* Set a certification authority name
* Configure certificate expiration period
See [Certifications](/learning/certifications) for more.
***
## Cover image
The cover image appears on the course intro page and in the catalog. To set or update it, open the course intro and select **Change photo**.
### Blur the cover image
You can apply a soft blur to the cover image without replacing it — useful when the photo is busy, low resolution, or you want the title and description to stand out.
Navigate to the course you want to edit.
On the cover image, select the blur icon next to **Change photo**. The icon highlights when blur is on.
The change is saved immediately and applied for all learners — you don't need to republish the course.
Blur only affects how the image is displayed. The original photo is preserved, so you can turn the blur off at any time.
***
## Publishing & versioning
Courses have a **draft** and **published** version:
* Edit the draft without affecting what learners see
* Publish to push changes live
* Version number increments on each publish