The in-app launcher is in beta, and Juno turns it on for your organization. Until then, the In-app launcher tab doesn’t appear. Ask your Juno contact to turn it on.
Before you start
The launcher signs your users in with your Portal SSO signing secret. To create one, see Signing key for the in-app launcher.Set up the launcher
1
Create the signing key
In Admin > Security > Developer Settings, generate a Portal SSO signing secret and switch Portal SSO on. See Signing key for the in-app launcher.
2
Check your learner attributes
Select Settings at the top of the page. Learner attributes lists what rules can target: Juno’s own attributes, such as Manager and Department, are always there, and the attributes your product signs into each token show up the first time a page loads with them. See Learner attributes.
3
Send the install to your developers
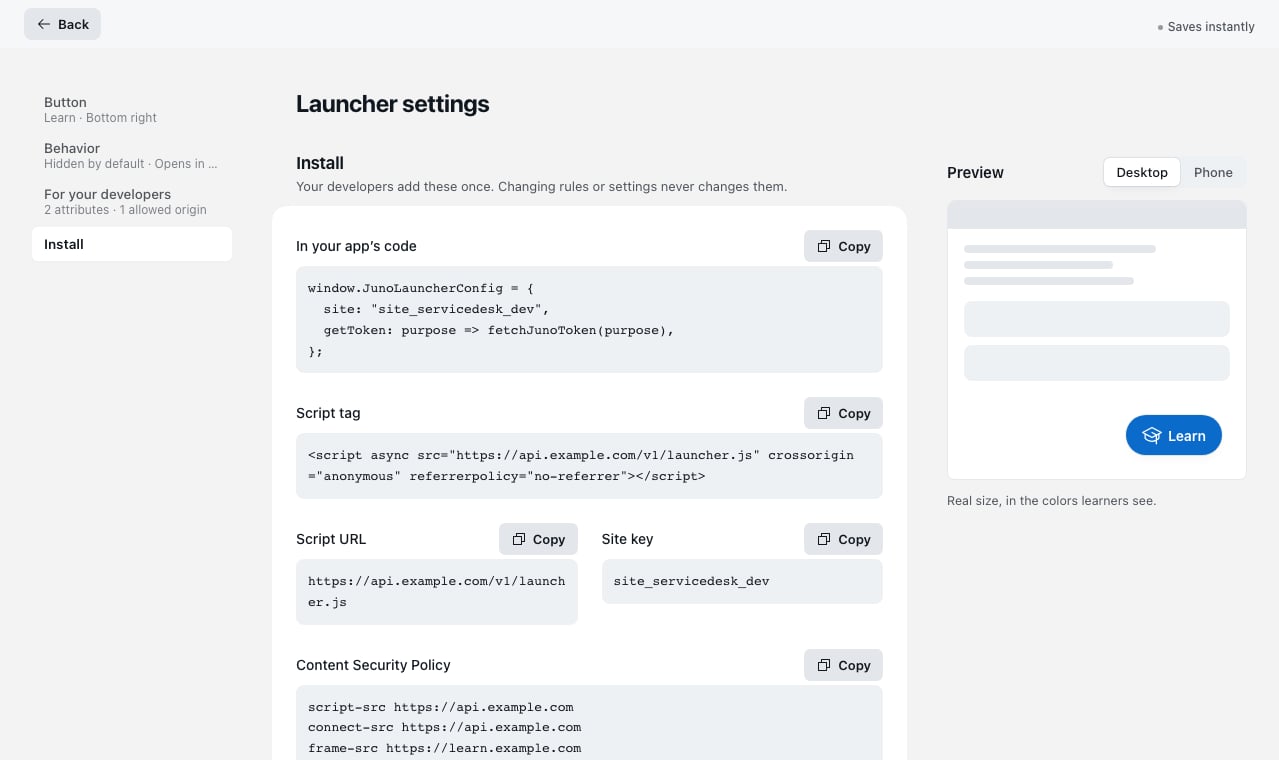
On the same page, Install has the code, the script tag, and the Content Security Policy lines for your product. Send them to your developers, with Install the in-app launcher.
4
Add rules and test them
Add a rule for each page that needs learning. Check it in the Test box, then make it live.
5
Turn the launcher on
At the top of the page, switch the launcher on. The button then shows wherever your rules allow.
How rules work
A rule says: on these pages, for these users, show the button and open this learning, or hide the button.- The most specific rule decides. When several rules match the page and the user, the rule that names the page most exactly decides. A rule on
/tickets/newbeats a rule on/tickets/:id, which beats a rule on/tickets/*, which beats a rule on every page (*). Between equally specific rules, the upper one in the list decides. - No match. When no rule matches, the When no rule matches setting in Settings decides. By default, the button stays hidden.
- Where a click lands. A rule that shows the button opens its Target. A rule with no target opens the Default learning from Settings.
- A list behind the button. When several matching rules point at their own learning, a click on the button opens a short list of that learning. The page’s own learning comes first, then the learning from the pages above it, up to the first rule that hides the button. When no rule adds a row, the click opens the target directly.
- Changes reach your users within about a minute. Publishing, pausing, editing, reordering, and deleting a rule all apply within about a minute.
The page map
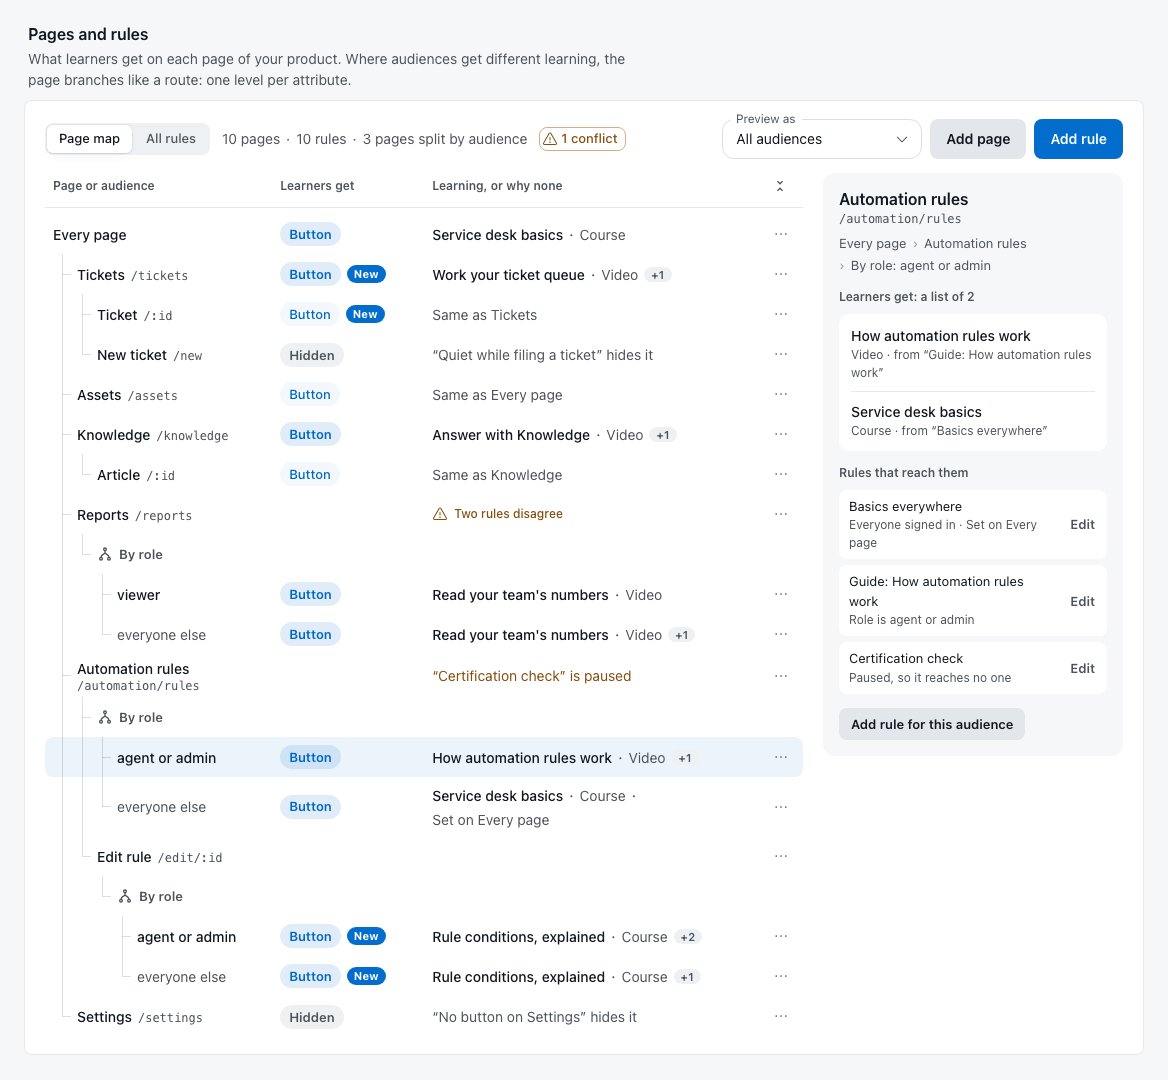
Pages and rules opens on the Page map: your product’s pages as a tree, the way a router nests its routes. A page sits under the page above it, so/tickets/:id sits under /tickets. Every page at the top holds the rules for all pages.
Each page is one line: what learners get there, then the learning they get, or why they get none.
- Button or Hidden says whether the button shows there, with the rule’s notification beside it, such as New.
- The learning column names the first course or video behind the button, with +1, +2 and so on when the list holds more. When learners get nothing, it says why: No rule, so Settings hide it, the rule that hides the button, or the page’s rules that aren’t live yet, such as a draft or a paused rule.
- Same as means the page has no rule of its own and gets exactly what the page above it gets.
- Two rules disagree marks a page where a rule that shows the button and a rule that hides it are equally specific. The upper rule in All rules decides. Select the conflict count above the map to open that page.
- Pages that split by audience. The map starts on All audiences. Where rules for an audience give learners different things on a page, the page splits the way a router nests a route: a By role line, then a line for each group of values, such as agent or admin, with everyone else last. A group whose learners still get different things splits again by the next attribute, such as By locale: one level per attribute, as many as your rules use, in the order Settings lists the attributes, then locale. Each branch ends in what those learners get, or why they get nothing. A rule that reaches no audience, such as a paused one, stays on the page’s own line. Select the end of a branch to see what that audience gets and the rules that reach it, and Add rule for this audience to start a rule for just those learners. The ⋯ button on an audience’s line starts one too, or a rule that hides the button for them. The count above the map says how many pages split, such as 3 pages split by audience.
- Set a split on the map. Select a page, then Split by audience, and pick an attribute from one list of Juno’s attributes and your product’s. A By role line appears under the page: select it to name the values that get their own line, change the attribute, or remove the split. Select a value’s line to add learning for those learners, which starts as a draft until you put it live, to choose No button here, or to split it again by another attribute. The ⋯ button on the line starts the same things. Removing values or a split asks first when it would delete learning set on them. Splitting a page moves the rules for everyone on that page alone into everyone else. A rule for that page together with other pages, or with an audience of its own, stays outside the split: it still applies on that page, and when it’s higher in All rules, it wins over the split.
- Preview as. Select Everyone to count only the rules with no audience; a page with rules for a specific audience then says how many, such as 1 rule here is for other learners. Select a learner, such as Role: agent, to see what that learner gets on every page.
- Collapse pages. Point to a page, or move to it with the keyboard, and select the arrow beside its name to hide the pages under it. The row then says how many pages it hides, and still warns when rules disagree on one of them or when one of them splits by audience. Collapse all, above the last column, leaves only the top-level pages, and Expand all brings every page back.
- Add your pages. The map lists every page your rules name. Select Add page to add the others, with a Name and a Path such as
/tickets/:id. From a page’s actions menu, Name this page or Rename page changes its name, and Remove page takes it off the map. Removing a page never changes a rule. - Start a rule from a page. From a page’s actions menu, or under the selected page, Add rule here opens the rule editor with that page and the pages under it filled in. Hide the button here starts a rule that hides the button on that page.
Add a rule
1
Open the rule editor
Under Pages and rules, select Add rule. To start from a page, open its actions menu on the page map and select Add rule here.
2
Name it and add its pages
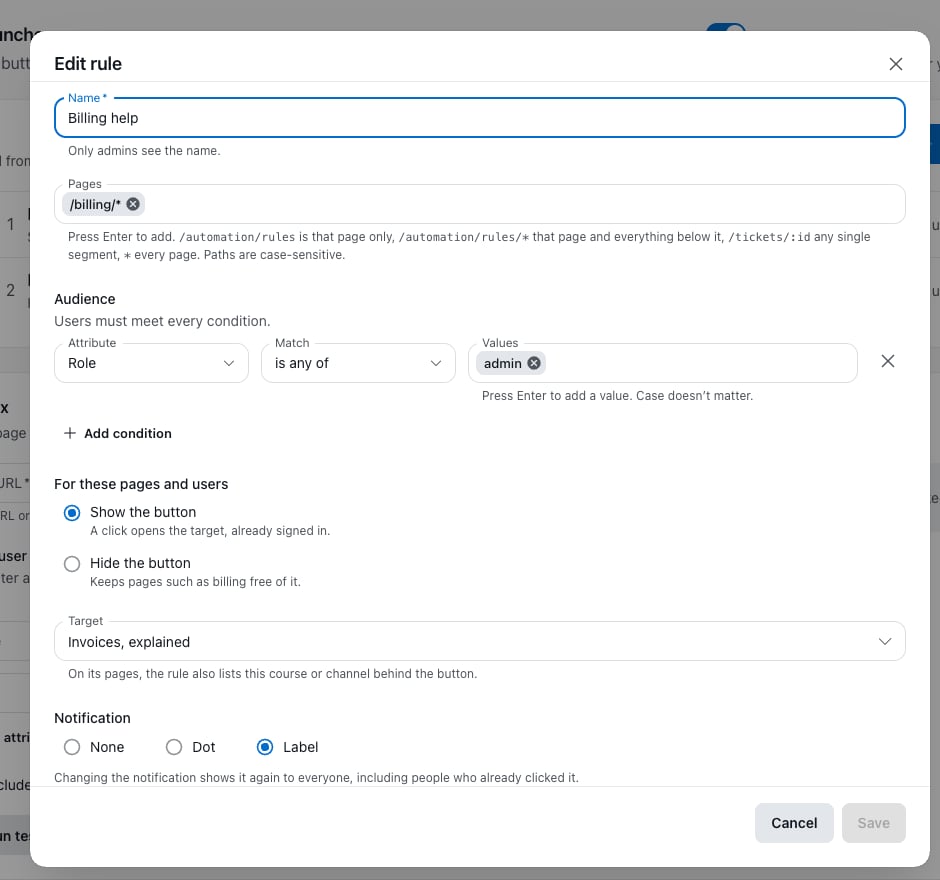
Enter a Name. Only admins see it. Under Pages, type a page pattern and press Enter, for each page the rule covers.
3
Choose its audience
Leave Audience empty for everyone who is signed in, or select Add condition to narrow it down.
4
Show or hide the button
Under For these pages and users, choose Show the button or Hide the button. A rule that shows the button can also have a Target and a Notification.
5
Choose its status and create it
Under Status, choose Draft to test it first, or Live. Then select Create rule.
Pages
Each pattern is a path in your product. A rule takes up to 20 patterns.- Start each pattern with
/. A*stands on its own, as the last segment, or alone for every page. - Paths are case-sensitive. The query string and a trailing slash don’t matter.
- Patterns match the part of the URL after the domain, and ignore anything after
#. If your product keeps its route after the#, set Match pages on to Hash (#) in Settings: patterns then match the route after the#.
Audience
Conditions narrow a rule down to some of your learners. A learner must meet every condition.- Attribute opens the list from Learner attributes, in the same order. Search finds an attribute by its name, its key, or one of its values. An attribute that another condition of the rule already uses leaves the list.
- To target a key your product doesn’t send yet, type the key in the search and select Use “key”, a key your product doesn’t send yet. It then shows in Learner attributes as Not seen yet.
- A Juno attribute carries a Juno tag. Juno knows a learner once they’ve opened Juno from the launcher; until then, Juno’s attributes have no value for them.
- is none of, has none of, and isn’t also match learners with no value, such as a learner Juno doesn’t know yet: Manager isn’t Yes reaches them, Manager is No doesn’t.
- Values ignore case. For Locale, a language on its own covers its regions:
encoversen-USanden-GB, whileen-UScovers only itself. Other attributes match whole values. - A value can’t be an email address.
- A rule takes up to 10 conditions, each with up to 50 values.
- Learning set on part of a page’s split takes its page and audience from the split, so the rule editor shows neither: change them on the page map. See Set a split on the map under The page map.
Target and notification
A rule that shows the button opens its Target: a course, journey, quiz, video, document, event, or channel, or your academy home. Search for it by name. Leave it empty to use the Default learning from Settings. A rule’s own course or channel is also listed behind the button on its pages. If a target is archived, unpublished, or deleted, clicks open the default target instead, and the rule says so in the list. If the default target itself isn’t available, clicks open your academy home. A Notification draws attention to the button:
Show until is optional: the notification stops showing after that day. A user who selects the button stops seeing that notification. If you change the notification, it shows again to everyone, including people who already selected it.
A rule that hides the button can’t have a target or a notification.
Order, pause, and delete rules
Under Pages and rules, select All rules. Each rule in the list shows its status, a summary of its pages and audience, and its clicks and users so far.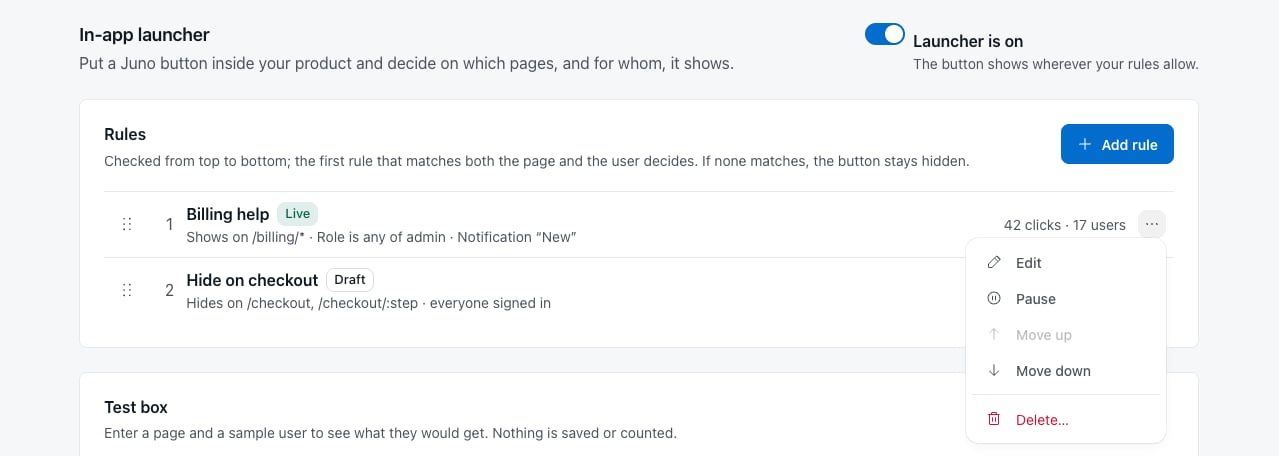
- Reorder. Drag a rule by its handle, or open its actions menu and select Move up or Move down. With a keyboard, press Space or Enter on the handle, move the rule with the arrow keys, and press Space or Enter to drop it. The order only decides between rules that are equally specific for a page.
- Publish, pause, and resume. From the actions menu, Publish makes a draft live, Pause skips a live rule until you select Resume.
- Edit. Select Edit to change any part of the rule.
- Delete. Select Delete…, then Delete rule to confirm. The rule stops applying within about a minute. You can’t undo this.
Test a page
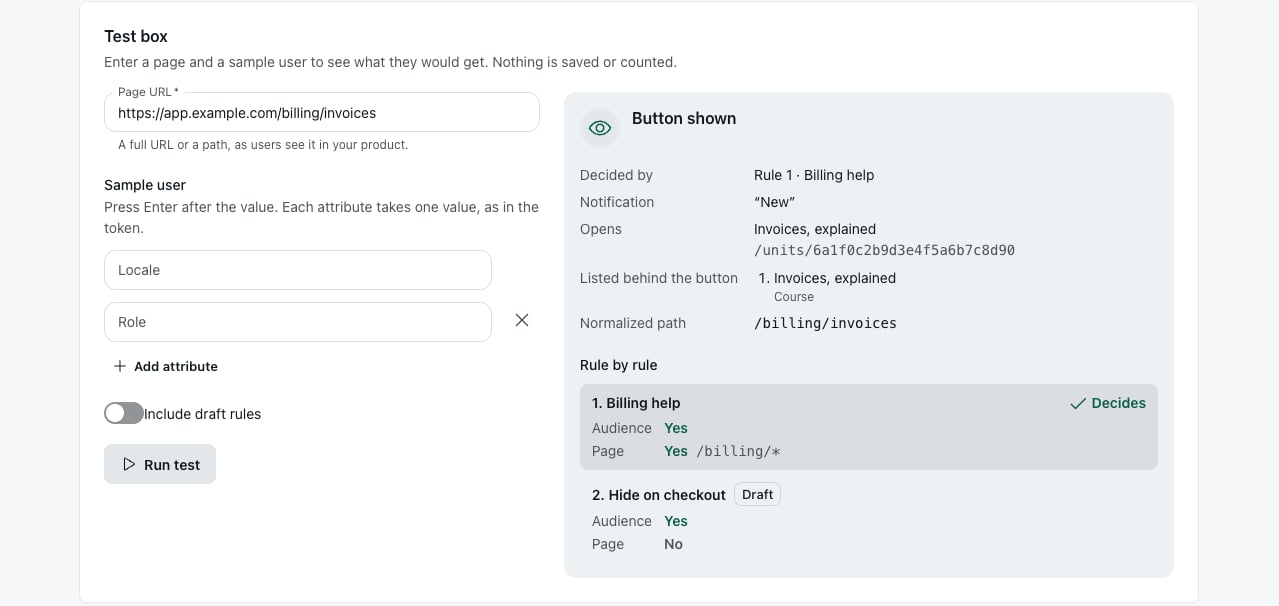
The Test box shows what one user would get on one page, without waiting for a real visit. Nothing is saved or counted.1
Enter the page
In Page URL, enter a full URL or a path, as users see it in your product.
2
Describe a sample user
Under Sample user, enter a value for Locale and for the attributes the rules use. Press Enter after each value. Leave out email addresses: launcher tokens never carry them.
3
Run the test
To check draft rules too, switch on Include draft rules. Then select Run test.
Settings
Select Settings at the top of the launcher page. The settings page works like a course’s settings: the groups are listed on the left with what each one holds now, and the preview on the right shows the button at real size, in the colors learners see, on a desktop or a phone. Every change saves right away: a choice as you pick it, a text field when you leave it or press Enter. A value that can’t be saved stays in its field with the reason under it; press Esc to put the saved value back. Removing an allowed origin asks first.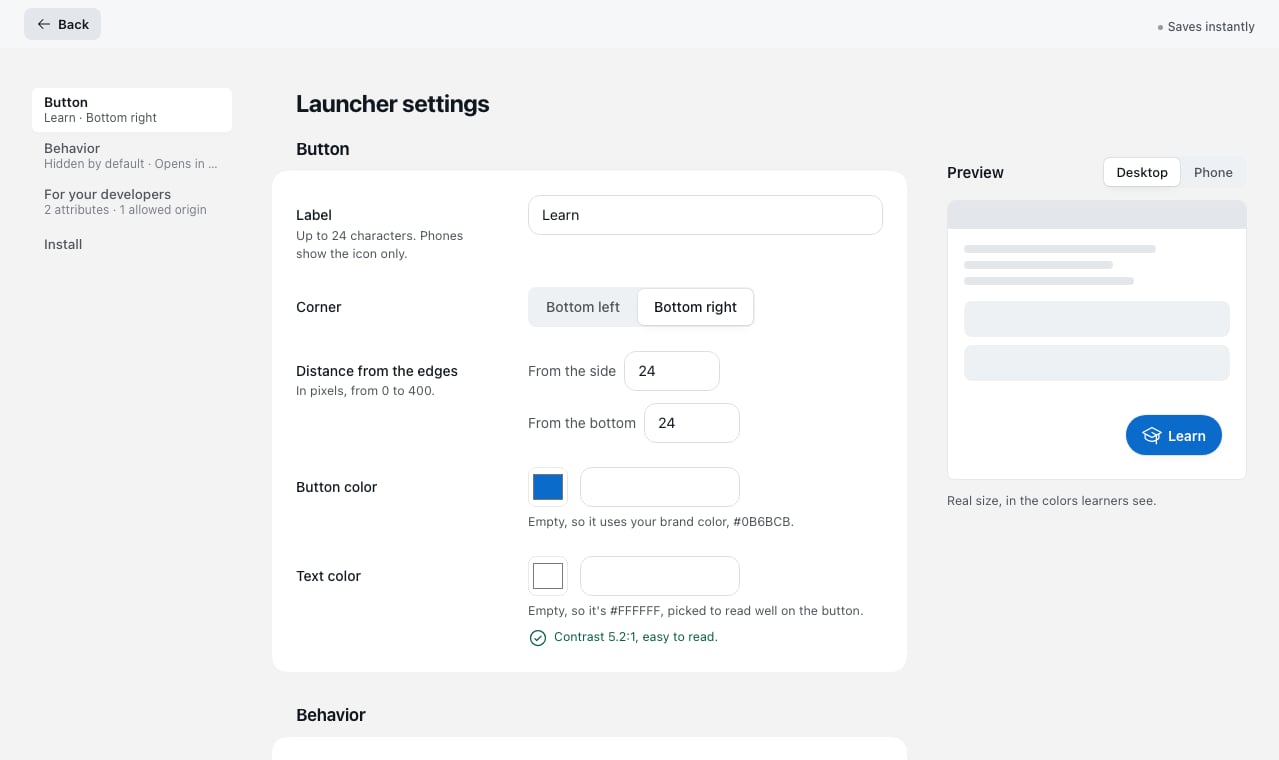
Under the colors, the page says how readable the label is on the button, and warns you when the contrast is too low.
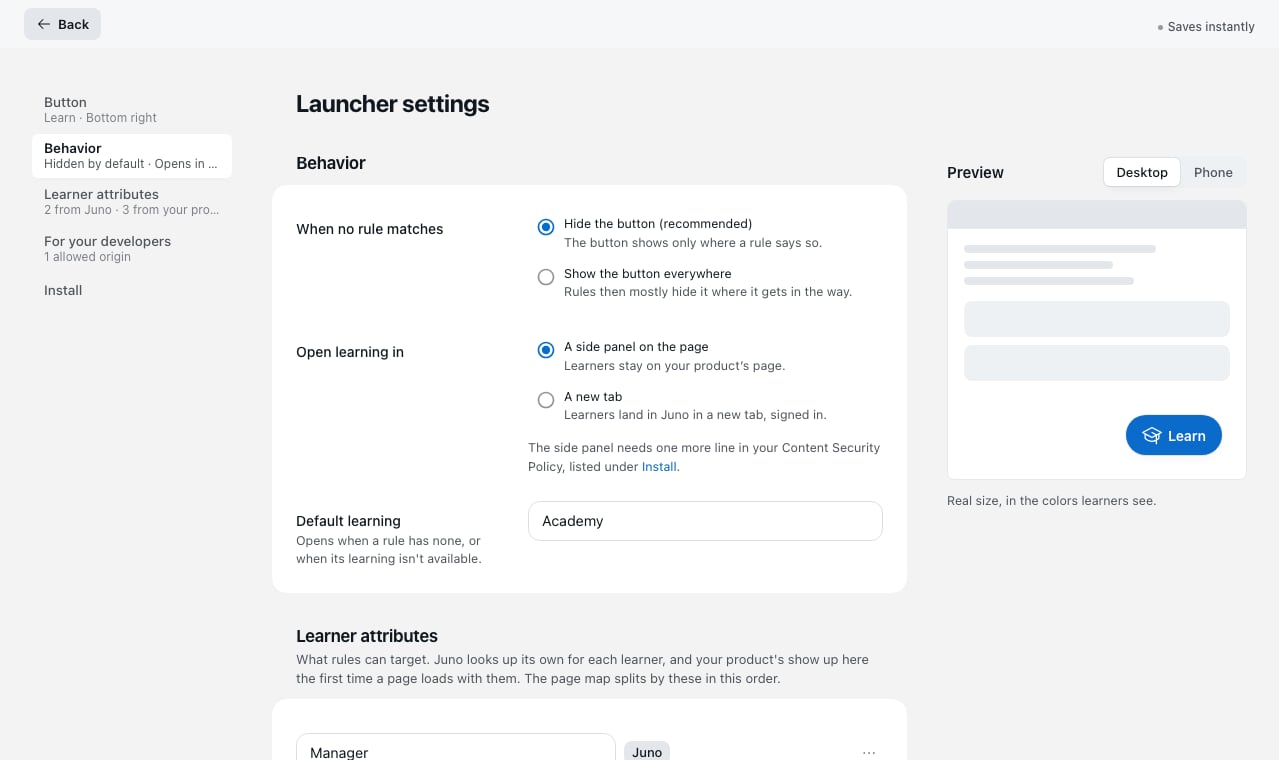
Open learning in
- A new tab: learners land in Juno in a new tab, signed in.
- A side panel on the page: learners stay on your product’s page, and the learning opens in a panel beside it. Your developers add one more Content Security Policy line, listed under Install. See Open in a panel on your page.
Learner attributes
Everything rules can target, in one list. You don’t declare anything: Juno looks up its own attributes for each learner, and your product’s attributes show up here the first time a page loads with them. Each row shows:- Name: what admins see in rules and on the page map. Change it and leave the field to save; an empty name goes back to the original one.
- Juno or Your product: where it comes from.
- On the line under the name: your product’s key as it is in the token’s
attrs, the type (Text, Number, Yes or no, Date, List, or Language for locale), the most common values Juno has seen, and when a token last carried it, such as Seen 3 days ago. Juno’s attributes are Always available.
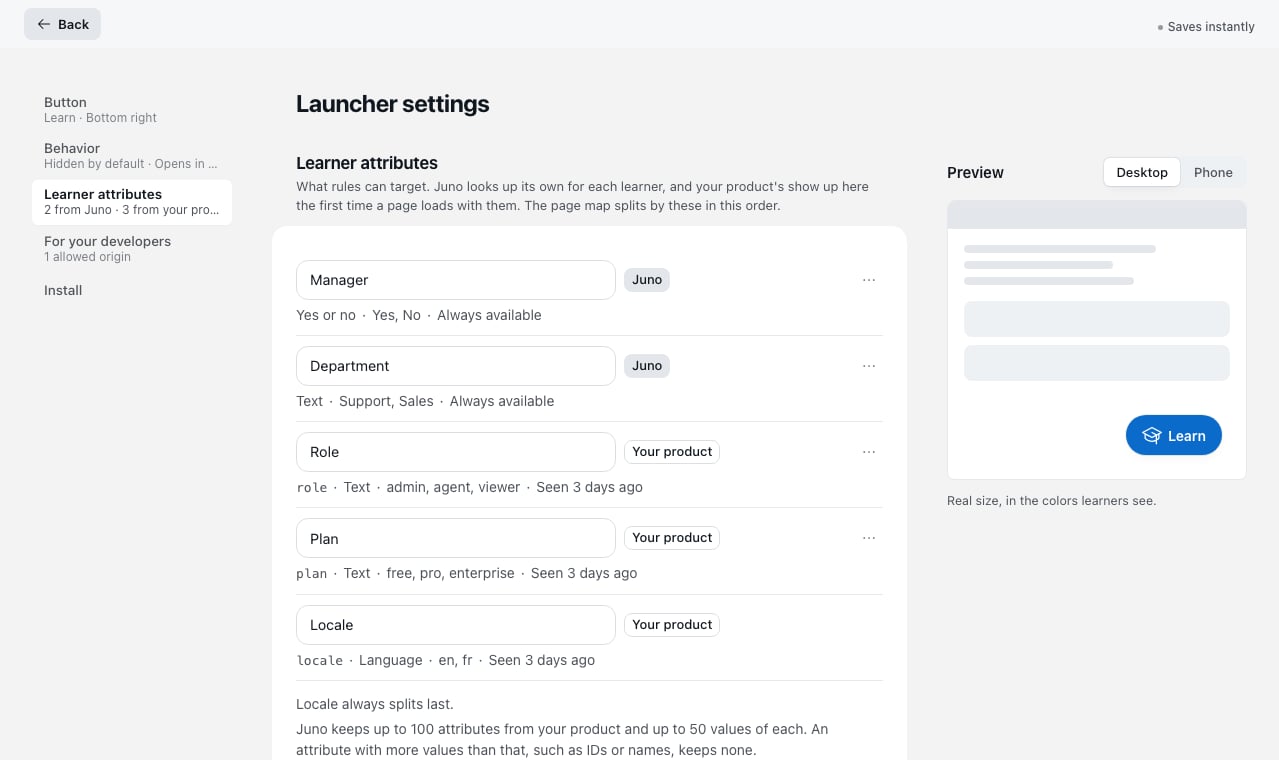
- Juno’s attributes: Manager (whether the learner manages anyone in Juno), Department, Job title, Location, Groups, and your workspace’s custom attributes of type text, number, yes or no, or date. Juno knows a learner once they’ve opened Juno from the launcher; until then, Juno’s attributes have no value for them.
- Your product’s attributes: the type comes from the values your product sends: text, a number,
trueorfalse, a date in ISO 8601 such as2027-01-31, or a list of these. Juno keeps up to 100 attributes from your product and up to 50 values of each. An attribute with more values than that, such as IDs or names, keeps none, and dates aren’t listed. Email addresses are never kept or listed: launcher tokens can’t carry them. - Order: the page map splits a page by these attributes in this order, top first, then by locale. To move one, select ⋯ on its row, then Move to top, Move up, Move down, or Move to bottom. Locale always comes last.
- A key that a rule names before your product sends it shows Not seen yet, with how many rules use it. A custom attribute deleted from Juno that a rule still names shows Removed from Juno.
Allowed origins
The launcher loads only on the addresses in this list, such ashttps://app.example.com. A * stands for exactly one part at the start of the host: https://*.example.com covers app.example.com, but not example.com or eu.app.example.com. A * can’t cover an ending that other sites share, such as *.co.uk or *.vercel.app. Juno support manages this list. To add or change an origin, contact Juno support. While the list is empty, the launcher loads nowhere.
Turn the launcher on or off
The switch at the top of the launcher page turns the launcher on or off for everyone, right away. When you turn it off, learners stop seeing the button within about a minute. Your rules and settings stay as they are, and the settings page says that the launcher is off.Install
Install, the last group of Settings, has what your developers add to your product once. The code, the script tag, and the Content Security Policy lines don’t change when you edit rules or settings.
Each item has a Copy button. Send them to your developers with Install the in-app launcher.